photography

What is a long exposure?

What is a long exposure?

A long exposure is when you use a shutter speed of about 1 second or longer.


Long exposures explained


When viewing landscape images you may have noticed clouds that streak across the sky. Waterfalls falls that appear to be in motion before your eyes. Water that is as smooth as glass reflecting mountain peaks with perfection. These images can appear to be highly edited when in fact, they are natural. This effect is created by utilizing your camera settings and certain filters. Taking long exposure photographs takes a bit of skill and a certain amount of gear. The images can be quite rewarding.

Notice in this image the clouds appear to be moving across the sky. Though there was a slight wind, the water appears to look as smooth as glass. This is one single image taken as a long exposure.

ISO 64. F/8. 30 Seconds

Watch how I captured this image on YouTube: Long Exposures Explained


Shutter Speed.

In order to do a long exposure you must understand what shutter speed is, and how to utilize it. Shutter speed is the length of time which your cameras shutter stays open to allow light to reach your cameras sensor. Depending on your camera type, it can usually be easily adjusted by turning a dial located on the back of your camera. Shutter speed is measured in seconds. For everyday shooting you will usually shoot at a shutter speed of 1/250th of a second or faster. If you try and use a slower shutter speed without a way to stabilize your camera, motion burr may occur.

Motion blur can ruin an image or it can provide artistic style if used correctly. Using a fast shutter speed will freeze action. Wildlife and sports photography rely heavily on using a fast shutter speed (usually 1/1000sec or faster) in order to freeze the action of their fast moving subjects. With landscape photography, a slow shutter speed is usually used (while using a tripod) as the majority of the subjects in the scene are stationary.

The above image was taken with a 2 minute and 34 second exposure.


The gear you need.

Camera:

You need a camera that that allows you to manually adjust the shutter speed.

Tripod:

A sturdy tripod is necessary to keep the camera completely still while taking a long exposure

Shutter Release:

Most cameras only allow a shutter speed of 30 seconds. Buying a shutter release will help to take images longer than 30 seconds by using it while your camera is in bulb mode.

Timer:

A stopwatch, or phone timer, is essential if you plan on doing exposures using bulb mode.

Filters:

Filters can allow you to take long exposures even during situations with a lot of light. Filters come in all shapes and sizes. Neutral density filters are what you need to slow the shutter speed of your camera. Filters are measured in stops of light they block out. 6-Stop (ND64) and 10-stop(ND100) are popular among landscape photographers. Filters are expensive as they are made from high quality glass. DO NOT BUY CHEAP FILTERS. Cheap filters are made with low quality glass that can significantly lower your image quality. I recommend purchasing a square/ stackable filter system as it is the most versatile option. Starting off with a single screw on ND filter is also a great way to learn how to take long exposures, and you can always upgrade later.


The best filters for landscape photography.

Are square filters worth buying? Indeed they are, here’s why.


Here is the gear I use for Landscape Photography: My Gear


On location.

You have invested in all of the necessary gear, hiked to an amazing viewpoint and are ready to take a long exposure, but how? First you need to figure out if a long exposure is necessary for the scene. A long exposure needs movement to be effective. Clouds moving through the sky, and water flowing are both great examples of how a long exposure can benefit an image.

Set up:

Spend a lot of time to frame your composition. Make sure your tripod is on a sturdy surface and will not move. If the camera moves while the shutter is open motion blur can occur, ruining your image.

Settings:

Knowing how to shoot in manual mode is a big advantage when taking a long exposure. You will want your ISO as low as possible to reduce the amount of noise. You also want to shoot between F/8 and F/11 as these are generally when you will receive the sharpest results.

Test Shots:

Take a few test shot before adding your filters to check focus and again fine tune your composition.

Focus FIRST:

Sometime when stacking on several filters your camera will struggle with finding focus, its very important to have your focus locked in before adding the filters.

Filters:

Add the ND filter(s) to your camera.

Set shutter speed.

If you are using a shutter release you have to figure out how long you will take the exposure by using conversion apps or using a formula.

Take the image.

Be prepared for a lot of trial and error especially when doing several minute exposures.

Tips.

Turn off auto focus to ensure your camera does not change focus when shooting.

Set your camera to timer mode using a 5 second timer to avoid camera shake when pressing the shutter.

Cover your viewfinder, light can find its way to your cameras sensor from the viewfinder affecting the image.

ISO 100. F/8. 5 seconds.


When not to take a long exposure.

It’s easy to always want to use your filters to capture a long exposure, but sometimes even when doing a long exposure correctly it can ruin an image. Here are some examples of when you should leave your filters in your bag:

No movement:

In order to make the effect of a long exposure visible you must have movement in your scene. Water and clouds are great examples. If there is no movement there is no reason to take a long exposure.

Too much movement:

If it’s a very windy day I would avoid taking a long exposure. If your main subject is moving, a long exposure will not turn out to be pleasing. Sometimes this can add artistic effects if the movement is complimenting the stationary subject or if the movement is not easily noticed.

ISO 64. F/11 30 Seconds.

The above image was taken during a very windy day. Notice the motion blur in mostly all of the trees and the bushes in the foreground. In my opinion, this makes the image appear a bit off and just not right.

ISO 64. F/9 3 Minutes 17 seconds.

The above image was shot on a day with a light breeze. If you look closely at the leaves on the tree you can see some motion blur present. I don’t believe this has ruined the image as the mountain in the background, the tree trunk and foreground remain sharp.


The 10-Stop ND Filter


Especially among landscape photographers the 10-stop filter is somewhat a legend. There is nothing more rewarding and unique than capturing a several minute exposure at sunset. A 10-stop filter can be very helpful in creating multi-minute exposures. This can produce some very unique and artistic results. 10-stop filters can be challenging to use in order to get a correct exposure, and require a lot of practice.

ISO 64. F/11. 6 minutes 12 seconds.


Watch how I captered the above image with a 6 minute exposure


Proceed with caution. When photographing sunrise or sunset you only have about 10 minutes, or less, of amazing light. When using a 10-stop ND filter an exposure can be several minutes, meaning that you might only get once chance to take an image. I have missed many shots by ending the exposure too soon, having motion blur present, or missing focus when trying to do a several minute exposure.

How to use a 10-stop ND filter.


The best way to get better at taking long exposures it to practice. Go get some ND filters and get out and shoot! The more you experiment and practice, the more comfortable you will be taking long exposures.


Want to learn even more about long exposures?


The Best Places for Photography in Hanoi

VietnaMs Capital


Hanoi is a city rich with culture. Its delicious food, cheap prices and friendly people are a draw for many tourists. Hanoi is also a photographers paradise. Old temples, and interesting people, Hanoi has it all.

Below are a list of my top 3 places for photography in Hanoi.


Hoan Kiem Lake

Located in Hanoi’s Old Quarter, Hoan Kiem Lake is a must visit for photographers. Meaning lake of the returning sword, there is a legend attached to the lake making it very important for locals.

-Thap Rua

Built to honor Le Loi, a Vietnamese hero, the turtle tower was built in 1886 on top of a small island in Hoan Kiem Lake. The tower has become a symbol for Hanoi.

Be sure to bring a telephoto lens to capture this stunning tower.

-Ngoc Son Temple

Located on an island in the north part of the lake, the name means “The temple of the Jade Mountain”. The temple was built in the 18th century to commemorate a Vietnamese war hero from the 13th century.

This temple looks stunning at blue hour but finding a clean composition including the bridge with no people around can be quite the challenge.


Tran Quoc Pagoda

Located on an island between West Lake and Truc Bach Lake the pagoda itself is over 1500 years old. Another symbol of Hanoi and one of the most popular attractions in all of Hanoi.

The best time to photograph the pagoda is at golden hour and blue hour. It can be quite popular with photographers so if you are using a tripod you might want to get there early to get set up. Bring a wide angle lens in order to capture the scene.


Hanoi’s Old Quarter

Hanoi’s Old Quarter is a great place for street photography. Its busy and full of culture. The people and the architecture are both very photogenic. The best way to spend a day here is to just wander around the streets looking for images. I would recommend taking a medium range zoom lens with you as you wander the streets to help capture interesting moments.

The best time to photograph this area would be around golden hour as the light is soft and dramatic. But anytime during the day there are still photos to be had.


Kakadu: A Wildlife Photographers Paradise
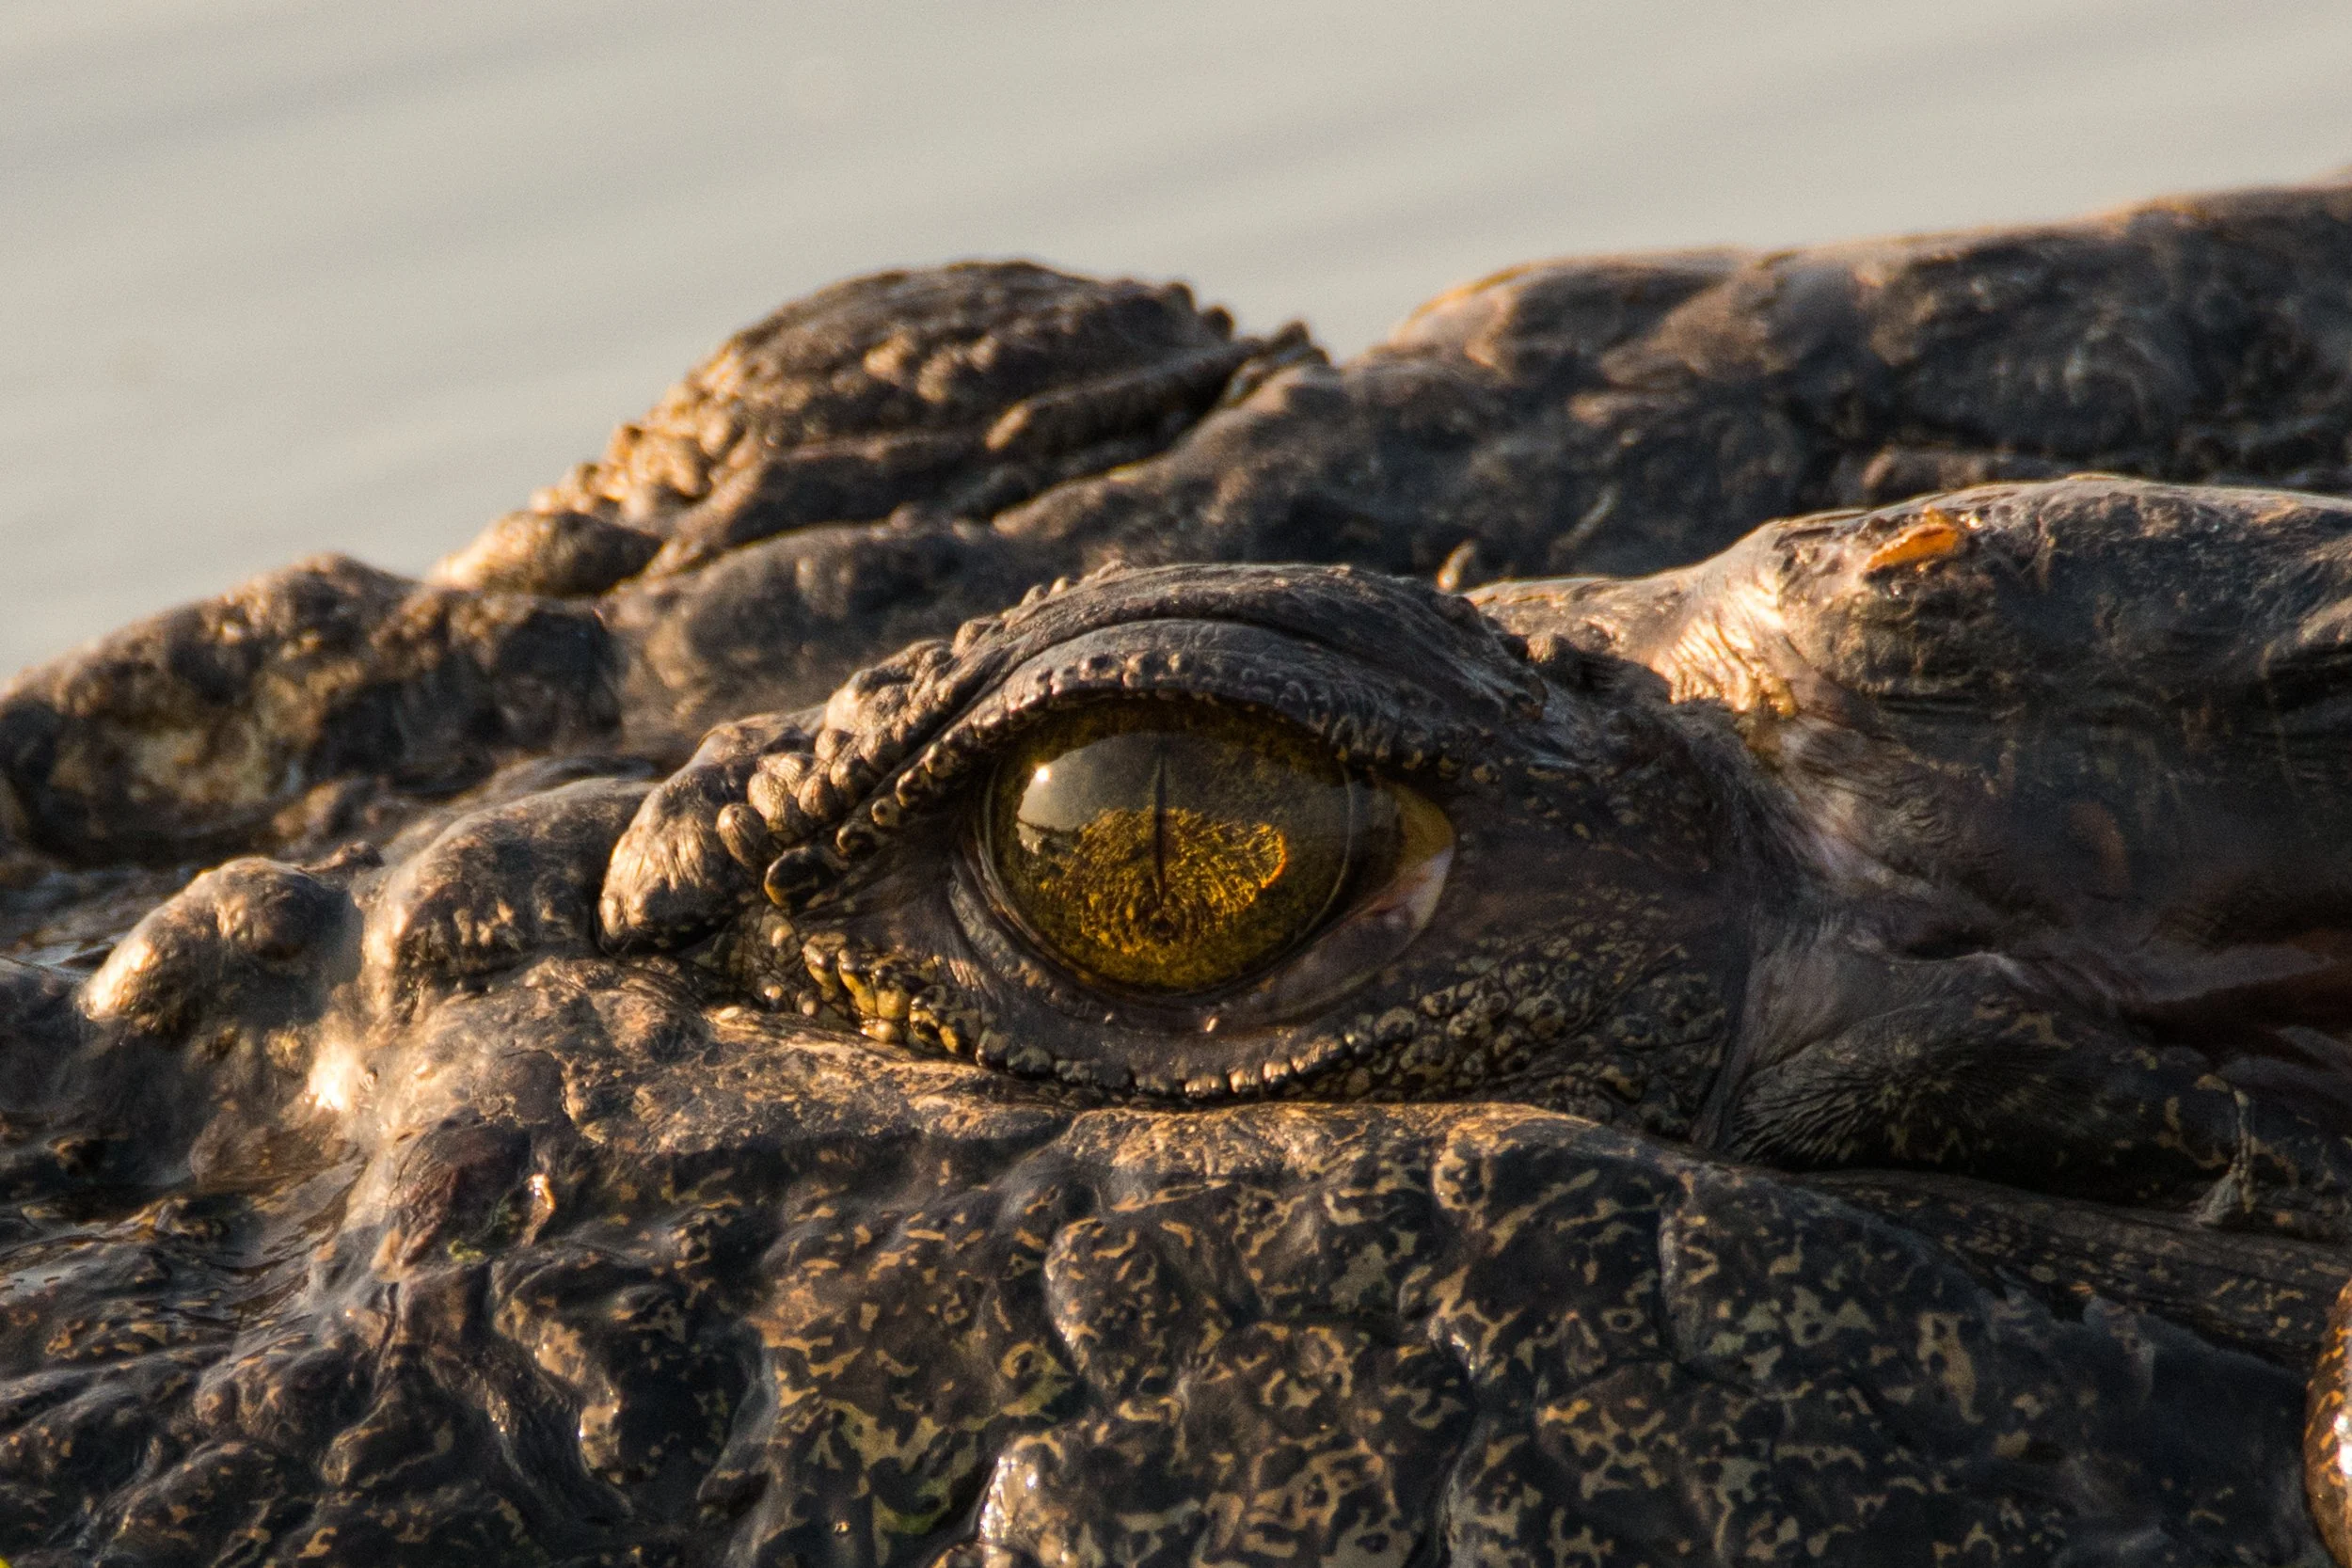
KAKADU National park


There are a few places around the globe that give you seemingly endless opportunities to photograph wildlife. Kakadu National Park is one of those special locations. located in the Top End of the Northern Territory of Australia. Covering 4.89 million acres of billabongs, waterfalls, savanna woodlands, and lowlands Kakadu hosts a large amount of wildlife. Approximately 280 different bird species, 60 mammal species, 25 species of frogs, and 117 species leaves no shortage of wildlife to photograph.

I took a 5 day holiday there in 2018 at the end of October to Kakadu. It has long been on my list to visit as I knew the park had a large amount of wildlife so on a road trip from Alice Springs to Albany I made it a point to spend several days there. In October it is the Dry Season so the waterfalls are not flowing too much but accessibility in the park is good as in the Wet Season roads frequently flood and a lot of the dirt road become inaccessible.

Below is an account of my few days in Kakadu. I highlight a few special places that I was able to get some amazing wildlife shots from. I only spent a few days there but the amount of wildlife I was able to see and photograph was stunning.


FERALS (Gunlom)

I arrived in Kakadu National Park mid-afternoon from the south and stopped at the first visitor center I found to gather information. I reviewed some maps and decided to stay at Gunlom Campsite for the night. I didn’t know what wildlife I would encounter in the area, I just new I was ready for adventure and to photograph some animals. The campsite was located down an app. 36km dirt road that had several spots of flooding and had terrible corrugation making it a slow yet thrilling drive.


I arrived at the campsite and hastily set up my tent and got settled in. I mad a quick lunch and relaxed from the heat of the day and then set out with my camera. The campground is surrounded by thick vegetation and a few open areas that I was able to do some off trail exploring around. It wasn’t long until I found my first subject. A few Sulphur crested cockatoos were in a tree and I was able to sneak up and get an image of one.

I continued onwards deeper into the bush fighting the green tree ants and the heat. I got into some thick forest and stopped when I saw movement ahead. I knew there were water buffalo in the park and I was looking forward to be able to photograph them. The animal I saw moving resembled a buffalo as I only saw its back. I snuck a bit closer in order to get a clear shot. It heard me coming and turned its head. It was not a water buffalo but rather a feral bull. It gave me a startle as I was not expecting to see such wildlife in a place as remote as Kakadu. I slowly backed away as the bull seemed quite bothered by my presence and I know that such an animal can be quite dangerous. As I made my distance between us, the bull went back to grazing and I went back into the clearing.


When I reached the clearing it wasn’t long until I saw my next large mammal. Out of the bush about 50 yards away emerged a beautiful black stallion. Feral horses, or brumbies, can be found all over Australia and there is a large population in Kakadu. I took a few images, then he stepped back into the bush. I wandered back to my campsite, ate dinner, and prepared for a restless sleep in The Territory heat.

I awoke for sunrise and returned to the same open area in the bush looking for the wild horses. I found a herd of them. They were running all around and were chasing each other. It appeared the large male was trying to mate with a few of the females. A few times they got uncomfortably close to where I was taking pictures. Brumbies can be very aggressive but luckily I did not get attacked. I then broke camp in early afternoon and set off to a new spot in the park.


Anbangbang Billabong

I decided to camp at Mardukal Campground. Being close to Yellow water, where I signed up for a morning and evening boat cruise, it was a convienient location to stay. I set up camp and decided to go explore the park and look for more wildlife to photograph. I decided to try my luck at Anbangbang Billabong. Located in the Burrungkuy region of Kakadu is Anbangbang Billabong. I went there in the afternoon to find wildlife to photograph and the location did not disappoint. I walked around the billabong taking pictures as I went looking for interesting wildlife to photograph. Everywhere I turned there was a new type of bird and I even managed to see a group of wallabies grazing in the carpark. After a successful shoot with an abundance of wildlife I headed back to camp excited for tomorrows cruise and hopefully being able to see crocodiles.


Yellow Water

I awoke early and headed to the port where I would board for the boat cruise. Part of the South Alligator River floodplain Yellow Water Billabong provide unmatched wildlife viewing and photography opportunities. The best way to view wildlife is to take one of the cruises. I booked 2 tours, sunrise and sunset, as I wanted as many possible opportunities to get pictures as possible. I specifically wanted to photograph water buffalo and crocodiles. I had plenty of opportunities to photograph both.

The 2 hour boat cruise was very much a success. I saw countless numbers of interesting birds, several water buffalo that were right by the banks and heaps of crocodiles. The crocs swam very close to the boat and it was amazing to be able to witness such prehistoric animals traversing the waterways so effortlessly. The tour guide was very knowledgeable on the area and the surrounds. The sides of the boat were perfect for me to rest my long lens on to be able to capture some extraordinary images.

There was no outlier in the sunrise or sunset cruise. On both I was able to see an astonishing amount of wildlife. I cannot recommend a Yellow Water Cruise enough. Though I normally stray away from tours It was one of the best experiences I have ever had for wildlife photography. It is almost guaranteed that you will be able to come away with some amazing images of the wildlife Australia’s Top End.


Mamukala wetlands

I awoke, broke camp yet again and headed into Jabiru, where I stayed at a campground with more services as I needed to do laundry and take a much needed shower. The heat and humidity in The Territory’s Top End is very extreme. During the day it would reach 110’F and at night not much lower than 80”F. This is definitely not ideal camping weather and each night I found it very uncomfortable to sleep. But I took it as a challenge. Being in a foreign land, in a new ecosystem I gladly endured the conditions for the reward of being able to experience such natural beauty was worth it to me.


After a morning and early afternoon of relaxing and cleaning, I got restless and decided to go out again to take some images. I headed east on the Arnhem Highway to another wet lands; Mamukala. I read of this location and decided to visit because it has a large variety of birds, as well as a viewing platform that works perfectly as a photography blind. I arrived a few hours before sunset, set up my camera and started shooting.

There was wildlife everywhere. All kinds of birds I didn’t know existed let alone knew their names. My 150mm-600mm lens had a perfect amount of reach and I was able to come away with several good images of Magpie Geese. I was also able to spot some agile wallabies on the bank with a few young joeys as well.


Two Mile Hole

So not really a recommended spot to do wildlife photography, I still went there and had an awesome experience.

Two Mile Hole is a secluded campground about 12km down a rough single land dirt road, north off the Arnhem Highway. I heard of this place by a ranger said a brumby was attacked by a crocs a few days prior. Also hearing it was free camping and no one goes there, I thought it would be a great place to try my luck with some wildlife photography there.

I arrived at the campground and sure enough, I was the only one there. The heat was almost unbearable. It was in a wooded area but the tree didn’t completely block out the sun and the humidity was terrible. I set up camp, relaxed for awhile, then gabbed my camera gear and set off in search of wildlife. The campground is right by the Branch Wildman River and I followed it for a few miles looking for crocs sunning on the banks. I traversed through the very thick vegetation being very attentive to where I was stepping as to be mindful of stumbling on a croc or stepping on a venomous snake. I encountered neither.

I found a clearing and sat for awhile waiting for any wildlife to emerge from the thick forest. As I sat I fought off the stings of the green tree ants and I did end up seeing a wallaby, but nothing else.

I headed back to camp and no one else had joined me in staying at the campsite. I prepared for a restless night of sleep in the heat. I awoke the next day and broke camp, then headed to Darwin putting an end to my time in Kakadu.


Kakadu National Park is an unmatched place to see some of Australia’s most iconic wildlife. Only a few hour drive from Darwin it is well worth planning a visit for photography. I got several portfolio shots by only spending a few days in the park. Though the conditions may be a bit of a challenge, the wildlife you will be able to see is more than worth any shortcomings of the park. (The park also hosts a lot of cultural significance and rock art that I did not mention)


Top 5 Locations in Far North Queensland For Landscape Photography (Cairns Region)

Cairns region, Queensland Australia


Cairns is a city located in Tropical Far North Queensland. It is the gateway to the great barrier reef. Surrounding Cairns is unmatched landscape photography opportunities. I spent 8 month living in the region, I had plenty of time to explore the surrounds and find some amazing locations to photograph.

There are epic waterfalls, thick jungles, tall mountains, and blissful seascapes, this region has so much diversity in a relatively small area. Where the rainforest meets the reef the population here is very scarce and there is a lot of National Parks and public areas to be explored and photographed.

For most of these locations the best way to see them is to hire a car or camper van.

It was very difficult to compose a list of my top 5 locations as there are so many. But here are 5 excellent landscape photography locations that must not be missed when visiting the epic Cairns Region.

(In no particular order)


  1. Daintree Rainforest

Located approximately 2 hours north of Cairns lies the Daintree Rainforest. Part of the largest rainforest in the world the Daintree is full of lush jungle and amazing seascapes. The only way to access it is to take a ferry across the Daintree River. The 180 million year old rainforest is a very special place to visit with an abundance of photographic opportunities. Lodging in the Daintree can be quite expensive so I usually camp at Noah Beach Campground.

Noah Beach Campground is only a few metres from the beach and there are several footpaths leading to the beach. I would walk the beach for sunset and sunrise looking for images. I was usually always able to get a few excellent shots. Every time I have stayed, it wasn’t too busy and it was peaceful and relaxing.


2. Palm Cove to Port Douglas

I have driven the 43km drive from Palm Cove to Port Douglas multiple times. It is one of the best drives I have driven in my life. The road winds along the ocean. Heading North you have mountainous rainforest to your left and the Great Barrier Reef and pristine sandy beaches to the right. There are multiple pullouts and beach access areas along the way that present exceptional photo opportunities. Many times I have explored these beaches and have not seen another soul for miles. Though the water looks very inviting swimming is not recommended due to crocs and Irukandji jellyfish being present in the water. If you arrive in Cairns and rent a car, it is definitely worth taking this route for sunrise and sunset to try and find some compositions.


3. Barron Gorge National Park (Stoney Creek Rd)

Located only about 25mins West of Cairns is Barron Gorge National Park. It is a tropical jungle/mountainous National Park with many sights to see and photograph. There are several different access points into the park and each way takes you to somewhere unique. Barron Falls is the main sight to see and it is definitely worth a visit. I do not have any images of the falls as I thought it didn’t photograph well and I couldn’t get a clear composition but it is definitely a spectacular sight to see and possibly photograph. Most of my favorite spots to photograph in this park take a little bit of trekking to reach but they are well worth it.

All 3 of the following locations are in the same general area on Stoney Creek Road.

—Glacier Rock

Starting at the end of Stoney Creek Rd. One of the more popular hikes, Glacier Rock, is a 6km return hike. This somewhat strenuous hike takes you through some thick jungle and up the mountain until you are treated with views of the surrounding towns and the ocean.

Watch on YouTube: Hiking to Glacier Rock for Sunset


—Smith Trail

Approximately 1km before Stoney Creek Rd. ends, there is a pullout for the Smith Trail. One of my favorite hikes in the region, the Smith Trail starts with a steep ascent, then follows a river with multiple small waterfalls that are very picturesque.

Watch on YouTube: Photographing Waterfalls on the Smith Trail


—Stoney Creek

Starting at the same trailhead as Glacier Rock, Stoney Creek trail takes you along the river and presents many compositions. The trail ends at a waterfall but if you choose to keep following Stoney Creek off trail for a few more miles you will be taken to stunning Stoney Creek Falls.

Watch on YouTube: Jungle Trekking To Stoney Creek Falls


4.Nandroya Falls

Located 120km south of Cairns in Wooroonooran National Park (fun word to say) is Nandroya Falls. A 6.6km return hike through some stunning jungle scenery that will take you to a very photogenic 50-metre drop waterfall. There is an upper and a lower falls with ferns everywhere, this is a truly spectacular location to photograph. Make sure to check yourself for leeches when you get back to the carpark, though not dangerous, I did have a few on my ankle the whole 2 hour drive home and I didn’t realize. I did this hike 4 times and it never got old. The best time to photograph the falls is when it is an overcast day. Since it is deep in the jungle light has a hard time reaching the falls.


5. The WaterFall Circuit (Milla Milla Area)

100km Southwest of Cairns and a few minute drive east from Milla Milla is The Waterfall Circuit drive. The drive is a 17km loop and it takes you to 3 amazing waterfalls. All the waterfalls are relatively accessible and all are very photogenic. You can do all 3 in a few hours. Surrounded by deep green ferns the Milla Milla circuit is a must see.

Milla Milla Falls

An 18m drop waterfall and is the most photographed waterfall in Australia. It is an easy walk to the falls down stairs to the carpark. This waterfall has also been featured in a few commercials. You can also swim in the waterhole in front of the falls leading to some interesting photo opportunities.


—Zillie Falls

30m drop waterfall that the top can be seen from an easy stroll from the carpark. If you feel a bit more adventurous you can climb down to the base of the falls. Of all 3 of the waterfalls in this circuit I would say that this one is the hardest to photograph due to the challenge in finding a clean composition.


—Elinjaa Falls

15m drop waterfall down a 200m path. This is by far my favorite of the 3. It is the least busy and I like how the waterfall is textured. There are many opportunities to move around with your camera trying to find a unique composition.

Watch on YouTube: Photographing 3 Amazing Waterfalls


Far North Queensland was on of my favorite regions to live in in all of Australia. It is so diverse and wild. There are so many places to explore and so many locations to photograph. The Cairns region should be on every landscape photographers list. If you visit, you will be sure to come away with several portfolio images.